

The question of whether a sound reflection filter is a necessary component for a home recording studio is a frequent point of inquiry within the professional audio community, particularly for aspiring voice-over artists and producers. This article aims to provide a definitive answer by examining the fundamental principles of acoustic recording and microphone technology.
Understanding the Home Recording Studio’s Purpose
At its core, a home recording studio is designed to create a controlled and consistent acoustic environment. This environment serves several critical functions: it must prevent external sounds from intruding into the recording space (sound ingress), prevent recorded sounds from escaping and disturbing others (sound egress), and, crucially, minimize the impact of unwanted sound reflections within the recording space itself. The ultimate goal is to capture a pristine audio signal, free from extraneous noise and coloration.
The Physics of Sound and Recording
To grasp the role, or lack thereof, of reflection filters, it’s essential to understand how microphones capture sound and how room acoustics influence recordings. Sound waves travel through the air and, when they encounter surfaces, they can be absorbed, transmitted, or reflected. In an untreated room, hard, flat surfaces like walls, ceilings, and furniture reflect sound waves, causing these reflections to reach the microphone from various angles. These reflected sound waves, often referred to as "reverberation" or "echo," can interfere with the direct sound source, leading to a less clear and less focused recording.
Addressing Sound Reflections: Traditional Methods
Historically, the primary method for mitigating unwanted sound reflections has been through acoustic treatment of the recording space. This involves introducing materials that absorb sound energy rather than reflecting it. Common examples include:
- Absorption Materials: Thick fabrics like curtains and blankets, acoustic foam panels, and specialized acoustic baffling are designed to absorb sound waves, converting their energy into heat.
- Diffusion: While absorption aims to reduce sound energy, diffusion scatters sound waves in multiple directions, breaking up strong reflections and creating a more even sound field. This can be achieved with irregularly shaped surfaces or specialized acoustic diffusers.
The principle behind these treatments is to either reduce the overall sound energy bouncing around the room or to break it up so that it doesn’t arrive at the microphone as a coherent, problematic reflection. The ideal scenario is to create an acoustically "dead" space where only the direct sound from the source is captured by the microphone.

The Rise of the Reflection Filter
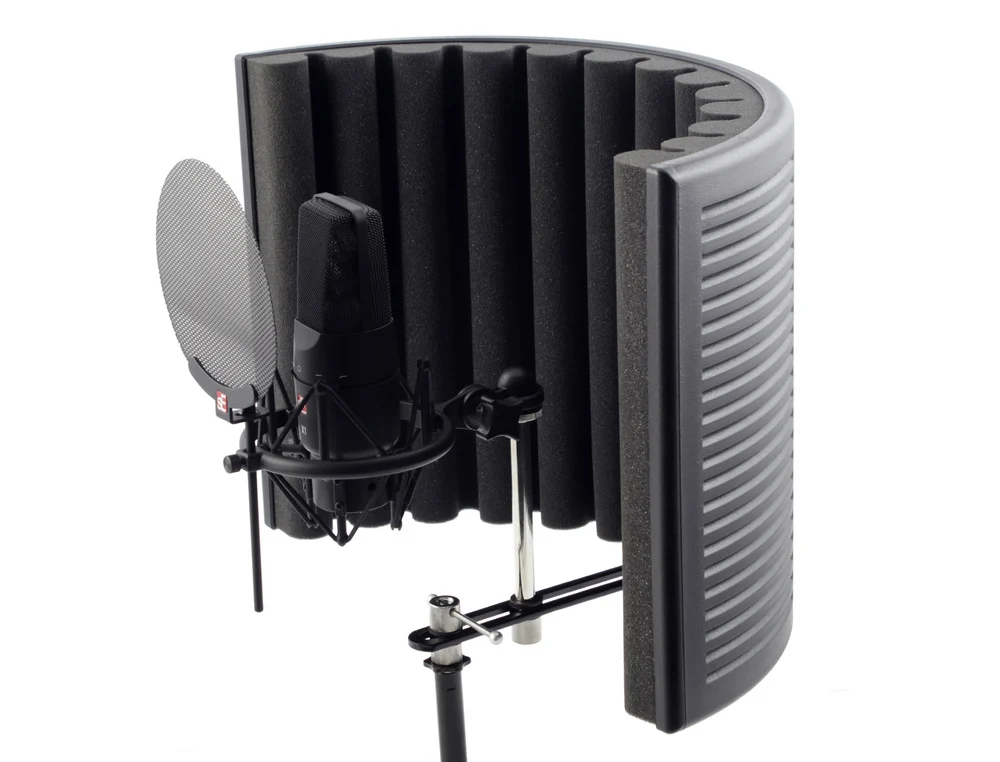
In recent years, portable "reflection filters" have become popular accessories for home studios. These devices typically consist of a curved shell lined with sound-absorbing material, designed to be mounted around a microphone. The marketing for these products often suggests that they create a personal "booth" around the microphone, effectively isolating it from room reflections.
Examples of widely available reflection filters include those manufactured by Auray and sE Electronics, among others. These units feature a semi-circular or cylindrical design, with the microphone positioned at the center. The intention is to block sound waves originating from the sides and rear of the microphone, thereby preventing them from interacting with the room and returning to the microphone.
The Critical Role of Microphone Polar Patterns
The effectiveness, or lack thereof, of a reflection filter hinges significantly on the fundamental characteristics of the microphone itself, specifically its polar pickup pattern. A polar pickup pattern describes the directional sensitivity of a microphone – the areas from which it picks up sound most effectively relative to its front.
Microphones are designed with various polar patterns, each suited for different recording scenarios:
- Omnidirectional: Picks up sound equally from all directions (360 degrees). This pattern captures the most room ambiance but is also highly susceptible to unwanted reflections.
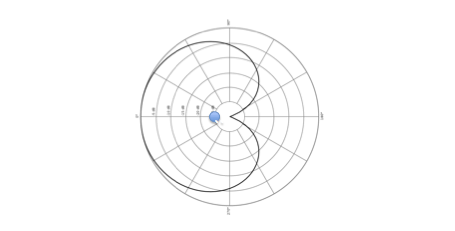
- Cardioid: Picks up sound most effectively from the front, with progressively less sensitivity to the sides and significantly reduced sensitivity to the rear. This is the most common pattern for voice-over and vocal recording due to its ability to reject off-axis sound, including room reflections.
- Figure-8 (Bidirectional): Picks up sound equally from the front and the rear, with significant rejection from the sides.
- Supercardioid/Hypercardioid: Variations of the cardioid pattern that offer tighter front pickup but also have a small lobe of sensitivity directly at the rear.
Many high-end microphones, such as the Neumann U87, offer switchable polar patterns, allowing users to adapt the microphone’s sensitivity to the recording situation. However, most microphones intended for home studio use are fixed as cardioid.
Analyzing the Cardioid Pattern in Practice
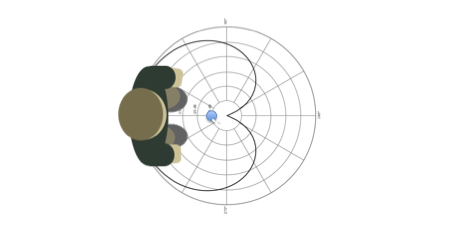
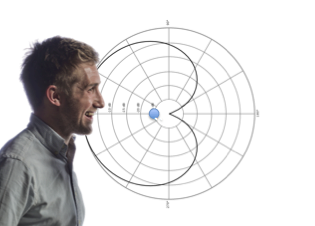
The cardioid pattern is crucial for understanding why reflection filters often fall short. When a microphone is set to cardioid, it is already designed to reject sound from its sides and rear. Imagine a top-down view of a cardioid microphone: the pickup pattern resembles a heart shape, with the point of the heart facing forward. This means that sound originating from behind the microphone, or significantly from its sides, is already attenuated by the microphone’s inherent design.
When a reflection filter is placed around a cardioid microphone, it attempts to block sound waves that the microphone itself is already designed to minimize. The filter’s absorbent material can reduce some side and rear reflections that might otherwise reach the microphone, but the primary benefit of the cardioid pattern—its rejection of off-axis sound—remains the dominant factor in controlling room coloration.
The "Filter" Effect: A Closer Examination
Consider the typical setup: a voice artist speaking into the front of a cardioid microphone, with a reflection filter surrounding it. The sound waves generated by the voice travel directly to the front of the microphone. However, these sound waves also travel outwards and bounce off surfaces in the room—walls, ceiling, floor, furniture. These reflected sound waves then travel back towards the microphone from various angles.
The cardioid pattern inherently attenuates these reflected sound waves, especially those coming from the sides and rear. The reflection filter, positioned behind and to the sides of the microphone, can indeed absorb some of these returning reflections before they reach the microphone. However, the crucial point is that the microphone itself is already significantly reducing the pickup of these sounds due to its directional pattern. The perceived difference in recordings made with and without a reflection filter, when using a cardioid microphone in a moderately reflective space, is often negligible.
Empirical Evidence and Expert Consensus
Numerous audio engineers and seasoned voice-over professionals have conducted tests comparing recordings made with and without reflection filters. The consensus among many is that the audible difference is minimal, particularly when compared to the impact of proper acoustic treatment of the entire recording space.
One common observation is that while the reflection filter might slightly reduce the perceived "liveness" or reverberation of a recording, it does not fundamentally alter the acoustic character of the room in the way that a well-treated booth or room can. The reflections that are most problematic are often those that are strongest and most direct, and the cardioid pattern of the microphone is the primary tool for combating these.
Why Do People Buy Reflection Filters Then?
The persistent popularity of reflection filters can be attributed to several factors, primarily rooted in marketing and the aspirational nature of home studio setup:
- Visual Appeal and Perceived Professionalism: Reflection filters visually present themselves as professional studio equipment, creating an impression of a more serious recording setup.
- Marketing and Endorsements: Manufacturers invest heavily in marketing campaigns, and many early adopters or less experienced users see them in use by others and assume their efficacy.
- Misunderstanding of Acoustics: The complex nature of acoustics can be daunting. Reflection filters offer a seemingly simple solution to a complex problem.
- Confirmation Bias: Once purchased, users may convince themselves of the benefit, even if the audible improvement is not significant, to justify the expenditure.
It’s important to note that while a reflection filter may not actively harm a recording (it doesn’t introduce new noise, it just fails to provide significant benefit), it represents a misallocation of resources that could be better invested in genuine acoustic treatment.
The True Path to High-Quality Home Studio Recordings
The most effective way to achieve professional-sounding recordings in a home studio is not through a reflection filter, but through dedicated acoustic treatment of the recording space. This involves creating an environment that minimizes unwanted reflections and external noise.
Creating an Acoustically Treated Space: Key Strategies
- Choosing the Right Location: Selecting a room with less inherent echo and fewer hard surfaces is the first step. Smaller rooms can sometimes be easier to treat effectively.
- Building a Vocal Booth: This can range from a professionally constructed booth to a DIY solution. The key is to create an enclosed space lined with sound-absorbing materials.
- DIY Acoustic Treatments: Even without a dedicated booth, significant improvements can be made by strategically placing absorbent materials. This includes:
- Bass Traps: Essential for controlling low-frequency buildup in corners.
- Acoustic Panels: Placed on walls and ceilings to absorb mid and high frequencies.
- Diffusion Panels: Used to scatter sound and prevent a "dead" or unnatural sound.
- Temporary Solutions: Heavy blankets, duvets, or even strategically placed furniture can offer some degree of acoustic control in a pinch.
The principle remains consistent: the goal is to control the sound within the entire recording area, not just immediately around the microphone.
Conclusion: A Question of Necessity
In direct response to the oft-asked question, the answer is a resounding no, you do not need a sound reflection filter for your home studio. While they may appear to offer a solution, their actual impact on the quality of recordings made with directional microphones, particularly cardioid, is negligible. The money and effort invested in a reflection filter would be far better spent on understanding and implementing proper acoustic treatment for the recording space.
For those serious about achieving professional audio quality, the focus should always be on creating a controlled acoustic environment. This is the cornerstone of any successful recording, and it is a goal best achieved through thoughtful room treatment rather than auxiliary accessories that offer little to no tangible benefit. The true investment in a superior home studio lies in the understanding and application of acoustic principles, not in the purchase of a superficial fix.
